
Union Fitness 101: Adjusting the Power Racks
posted on September 24, 2018
Confession: every time I step into a new facility (like when I’m traveling), I still have this little moment of panic when I step up to a power rack or squat stand set-up that’s different from what I use at home. No one likes feeling like the only new kid who doesn’t know how to do the basics, like adjusting hooks and safety bars. That’s the bare minimum right?! Why can’t we just always intuitively KNOW how these things work? It’s so easy to get into a cycle of beating yourself up for simply being new to something.
Those panicky feelings haven’t kept me from lifting in new places for a long time, but I know for newer lifters, and especially new female lifters, decreasing this anxiety could mean getting started on a lifting program way sooner. I want every single person who steps into Union Fitness to feel confident and comfortable getting through their workouts, so I’ve put together this basic guide on how to adjust the racks in both the Fitness Center and the Strength Lab.
A brief aside: please know that if there is EVER a piece of equipment you don’t know how to use, the first thing you should do is ask one of our staff members. I promise you, you’re not inconveniencing us, and we’re happy to help. However, I understand that sometimes, anxiety can get in the way. Refer to this guide when the thought of interacting with another person is just.too.much.
The Fitness Center Power Racks
In the Fitness Center, you’ve probably noticed the two huge power racks in the free weight area. There are three barbells between them, all 45lbs. You can use these racks for a huge variety of barbell movements: all kinds of squats, barbell lunges and other single leg varieties, overhead pressing, and you can (and should) pull a bench in for your bench pressing needs. One thing these are NOT useful for: deadlifts. You’ll need to do those out on the floor due to the height of the racks’ feet. Not a problem, just set yourself up behind the reach of the power rack and you’re ready to go (while keeping a rack open for someone else that may need it).
Now let’s talk specifics, and by talk I mean mostly show.
The power racks have j-hooks (where the barbell typically goes) and safeties (typically used so that in case of a failed lift, you have something to catch the bar and save your ass).
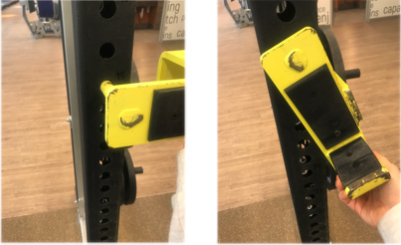
To move the hooks:
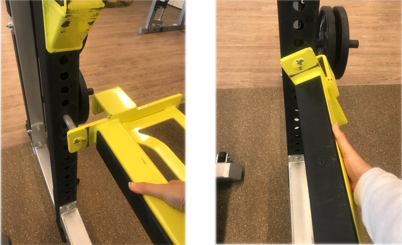
To move the safety bars:
The Strength Lab Rig
In the Strength Lab, we opted for a large, custom-made rig over power racks. The rig can be set for just about anything you want, and operates in mostly the same way as the power racks in the Fitness Center.
One major difference is in the variety (and therefore weights) of the bars available. If you want to read up on some of our specialty bars, look no further. For the most part, you’ll be using the Texas Power Bars, which are all marked with blue tape and weigh 45lbs. We also have a 35lb women’s bar (silver, no tape, normal length) and two 15lb practice bars (silver aluminum, short) that are super useful when you’re learning new movements.
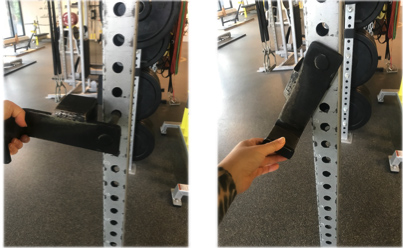
To move the hooks:
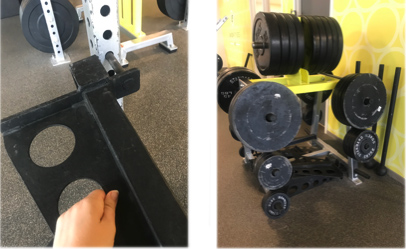
To move the safety bars:
Setting Up
Some quick tips for setting up your big exercises:
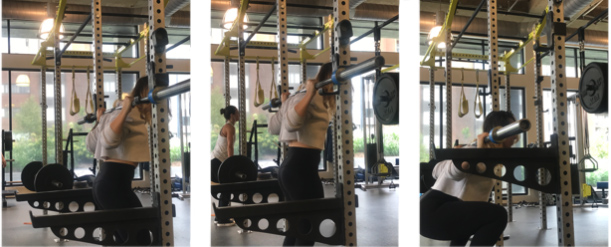
When setting up to squat, remember that you always want to unrack BACKWARDS, which means facing AWAY from the mirrors in the Fitness Center (we have none to distract you in the Strength Lab). No, you don’t need the mirror to check your form – ask a friend or UF Staff member to watch, or even record yourself squatting. Unracking forward is fine on the way out, but if the weight is heavy, getting the bar into the rack facing backwards is going to be difficult and dangerous.
Set your hooks so that when you get under the bar and stand it up out of the rack, you should completely clear the hooks. Again, this will make reracking after the lift much easier. If you find yourself getting up on your toes when you go to rack the bar, take your hooks down a notch.
Remember to use the safeties! You should place these so that they are 2” or so below where the bar sits when you’re at the bottom of a squat (see picture for reference). That way if you can’t get up, you just dip down a little lower and can get out of trouble.
To set up the bench press, keep the same principles in mind for hook placement. If you are unracking the bar alone, you need to be sure that you can clear the hooks before pulling the bar out of the rack. When you go to rerack, you should be able to easily put the bar back on the hooks. If you’re hitting the hooks while reracking, go down in height before you start attempting to bench heavy weight.
You can also use the safeties while benching! If you bench with your shoulders retracted (and you should be) you’ll have a little bit of an arch to give you a buffer in event of failure. The safeties should be set just below where the bar touches your chest. If you can’t move the weight, sink down into the bench and let the safeties catch the bar.
Final little tip: write those rack heights down! We marked every other notch on our racks to make it easier for you going forward. Add a little note to your program so you never have to guess again.
That’s about it! Get out there and lift to your hearts content.
Read More
