
Union Fitness 101: Using the Rower
posted on June 25, 2018
After we’d been open for a few months, we started asking members what other equipment they’d like to see in the gym. The number one most requested piece of equipment? The rower. We started out with just two, but their popularity made buying a couple more for the Cardio Lab an easy choice. We love the rower, we know lots of you love the rower, so we’re putting this quick guide together to help bring new people into the fold (plus some example workouts and tips for all the veterans).
What even is this thing?
The indoor rower, sometimes called an ergometer or erg in rowing circles, has been around in one form or another since the 4th century BC. Apparently, Athenians used it as a torture device, just as we use it now! Just kidding (mostly), it was a military training device that helped prepare soldiers for rowing at sea. The indoor rower as we know and love it mostly popped up in the mid-19th century. We actually still use the same flywheel design concept today with our machines! Through 1960, indoor rowers were mostly seen on college campuses, used by crew teams as off-season training. By the 80s, indoor rowing became its own kind of sport, and that popularity has only increased with the rise of Crossfit and other group training classes that utilize this piece of equipment.
Why do we use it at UF?
We don’t like to do things just because they’re popular here. We went ahead and bought a bunch because the indoor rower has proven itself as a useful and challenging piece of equipment over and over again. When used correctly, rowing is a low-impact way to get in a fantastic cardio workout while still building strength in the legs, back, chest, and arms! How often can one piece of equipment give you a true full body workout? You can use it for high intensity interval training (like or Cardio Lab: HIIT class) or for lower intensity, long haul workouts (think rowing a 5-10k). At the end of this article, I’ll give you a few workouts I’ve been doing on my own to get you started!
How do I use it?
If you refer back to our article on the Ski Erg, the set-up for the rower should feel pretty familiar: they are both Concept 2 products and use the same computer and damper system. Here’s the step-by-step guide to getting your rower up and running:
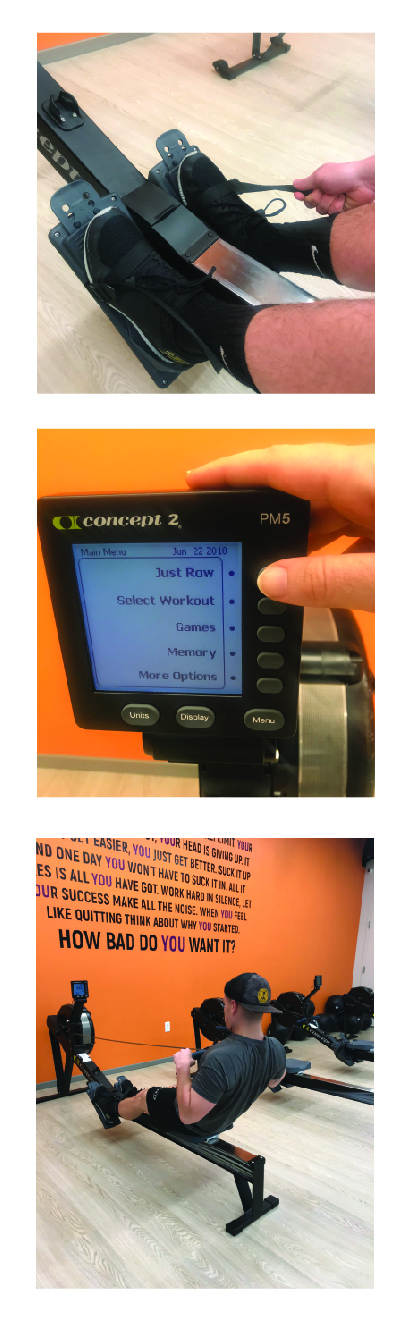
Tips and Tricks
Good rowing is really all about timing, building a rhythm, and maintaining tension. The chain on your rower should never be slack! You may be moving quickly and feel like you’re getting a good workout in, but tugging on that chain is hard on the equipment and more importantly, hard on your back. If you get a lot of low back pain while rowing, this is likely the culprit. To help clarify, here’s a video of one of our members who has excellent rowing form!
While rowing may seem like a “pulling” movement, like rowing a barbell or dumbbell in the Strength Lab, it’s really more of a pushing movement. While rowing, think about pushing the machine away with your legs, rather than pulling it towards you with your arms. Your legs are strong, let them shoulder most of the burden!
Rowing is a skill like anything else. Getting good at it means practice, practice, practice! You’ll want to use it in a variety of ways to learn the different rhythms of fast vs. slow rowing. Here are a few workouts I’ve done recently that could help:
Tabatas. You’ll row hard for 20 seconds, rest completely for 10 seconds, for 4 total minutes. This is short and sweet but brutal, and a great way to learn to row fast and smooth. Watch your meters here, try to move the same distance each round.
Long intervals: Warm-up for 500 meters and slow pace, then row a fast 250 meter piece. Rest for 500 meters and repeat up to 5 times. You’ll learn to maintain a hard pace over time.
Long distance: Work up to rowing a full 5k in one go. Make sure you have some good music on and get in that groove.
That should do it! If you ever have questions about rowing form or how to get more efficient, ask us! You can get a whole lot of the rower with a little bit of practice.
https://physicalculturestudy.com/2016/05/06/the-history-of-the-indoor-rower/
Read More
