Tag Archives: science

How I Balance Weight Training and Cycling.

The first sport I excelled at was cross country. I joined the team freshman year of high school, having had no real running background and fell in love with sport, the people, the feeling, and the progress. The desire to continue excelling got the best of my and I managed to turn a stress fracture in my femoral shaft into a full blown broken hip at the age of 17.


But as they say, everything happens for a reason and after surgery I started looking for new goals to work at and my friend escorted me to the local YMCA weight room. I’ll forever be in debt to him for introducing me to lifting considering that day influenced my major in school and my career path today. The problem arose when I was cleared to run again and I had to decide which discipline to devote my time too. The first step was deciding which was more important to me- considering I was planning to race my senior year of college, I had to make sure my cardiac fitness was where it needed to be. If we are being honest though, it has taken me years to learn how to appropriately balance cardio with weight training.


Progressing at two things at once is do-able for some time, but then starts to make you think “where would I be if I just focused on the one though?”. Multiple hiccups later (aka two more stress fractures) I began to cycle to feed that need for speed, without the impact. Low and behold I had begun a new obsession and was studying Kinesiology in college at the time I was ready to balance the two efficiently and appropriately. The key was figuring out how to use lifting as an adjunct to benefit my cycling, not take away from it. Figuring out the muscles I use on the bike core, glutes, hamstrings, quads and calves, and picking the exercises that strengthen those areas. I personally would never fully neglect the upper half of my body through, so I just did more days with a lower body emphasis than an upper. More recently I’ve been learning olympic lifts to work on my power since my cycling has a noticeable deficit in sprint efforts. I think the other important piece of information is to not be afraid of heavy weights affecting your cardio. For cycling especially, heavy sets of squat for minimal reps build the strength needed to push down on the pedals. Talking to an experienced coach or doing research yourself (the podcast Empirical Cycling Podcast shares a lot of quality information based of research) is your best bet to program efficiently.


In my opinion, if you’re using lifting as an adjunct then 2-4 full body workouts a week will show benefits. Doing both your passions can be done and weight training is actually starting to be encouraged as a preventative measure and a performance enhancer! Just a few generals that I go by though- performing the more important discipline first in the day while you have the most energy for it, not squatting heavy the day before a race or a hard workout, and don’t take it too seriously. The last thing I want to plug is that if you like cycling, so do I! Come talk to me about or maybe we can get a ride in! 


Leah (the kid).

Breathing and Bracing for Strong Lifts

Properly breathing and bracing is one of the most misunderstood aspects of a strong lift, but one that can play a major role. We’ve all either done it ourselves or have seen it at one time or another. Someone unracks their squat or sets up for their deadlift, they go to take a big breath to build tension and their chest gets full of air and the bar shrugs up on their shoulders. While this may seem like a great way to get tight, it is actually doing the complete opposite. What we actually want is too pull air deep into our diaphragm while expanding that pressure downward and outward into our abdominal muscles, obliques, and our lower back.


To understand this a little better, let’s break it down with a little bit of anatomy. When we take a breath before a lift we want to fill our diaphragm, not our lungs. Our diaphragm is located underneath of our lungs in the bottom portion of our rib cage. When done correctly, filling the diaphragm and keeping it locked in throughout the entirety of the lift can keep you in a strong and proper position and can allow you to lift more weight safely. When the diaphragm is filled and pressurized correctly, it can help connect the major muscle groups of our upper body to our lower half. This will help to build a tremendous amount of tightness and rigidity from head to toe.


When it comes to explaining and better understanding this method, I like to use the soda can analogy. Take an empty soda can and place a small dent in the side of it. Now place that soda can on a table and push down on it with your hand. There’s a 100% chance that it collapses with little effort. This is equivalent of breathing high into your chest. Now take another soda can without a dent in it. Place it on the counter and again try to push down on it with your hand. There’s a chance you wont even be able to collapse it this time. You have now successfully filled your diaphragm and braced completely. Which one do you think is better for a big lift?


As mentioned in the video, a simple and effective way to practice this technique is with a small micro mini band around your mid section. Be sure to place the band above your belly button as that is where you will get the most expansion from your diaphragm. This is also where you should place the center of your lifting belt if you wear one. Focus on taking a breath and pushing it downward and outward. While practicing this, be sure to look at yourself in a mirror. If your shoulders rise when you take your breath, then you are taking your air up into your lungs and your chest. Revert back to the soda can analogy. Continue to take your time and focus on your breathing and bracing every session and you will notice an immediate and sustained carryover to the quality and performance of your lifts for years to come.


Stay strong, friends.

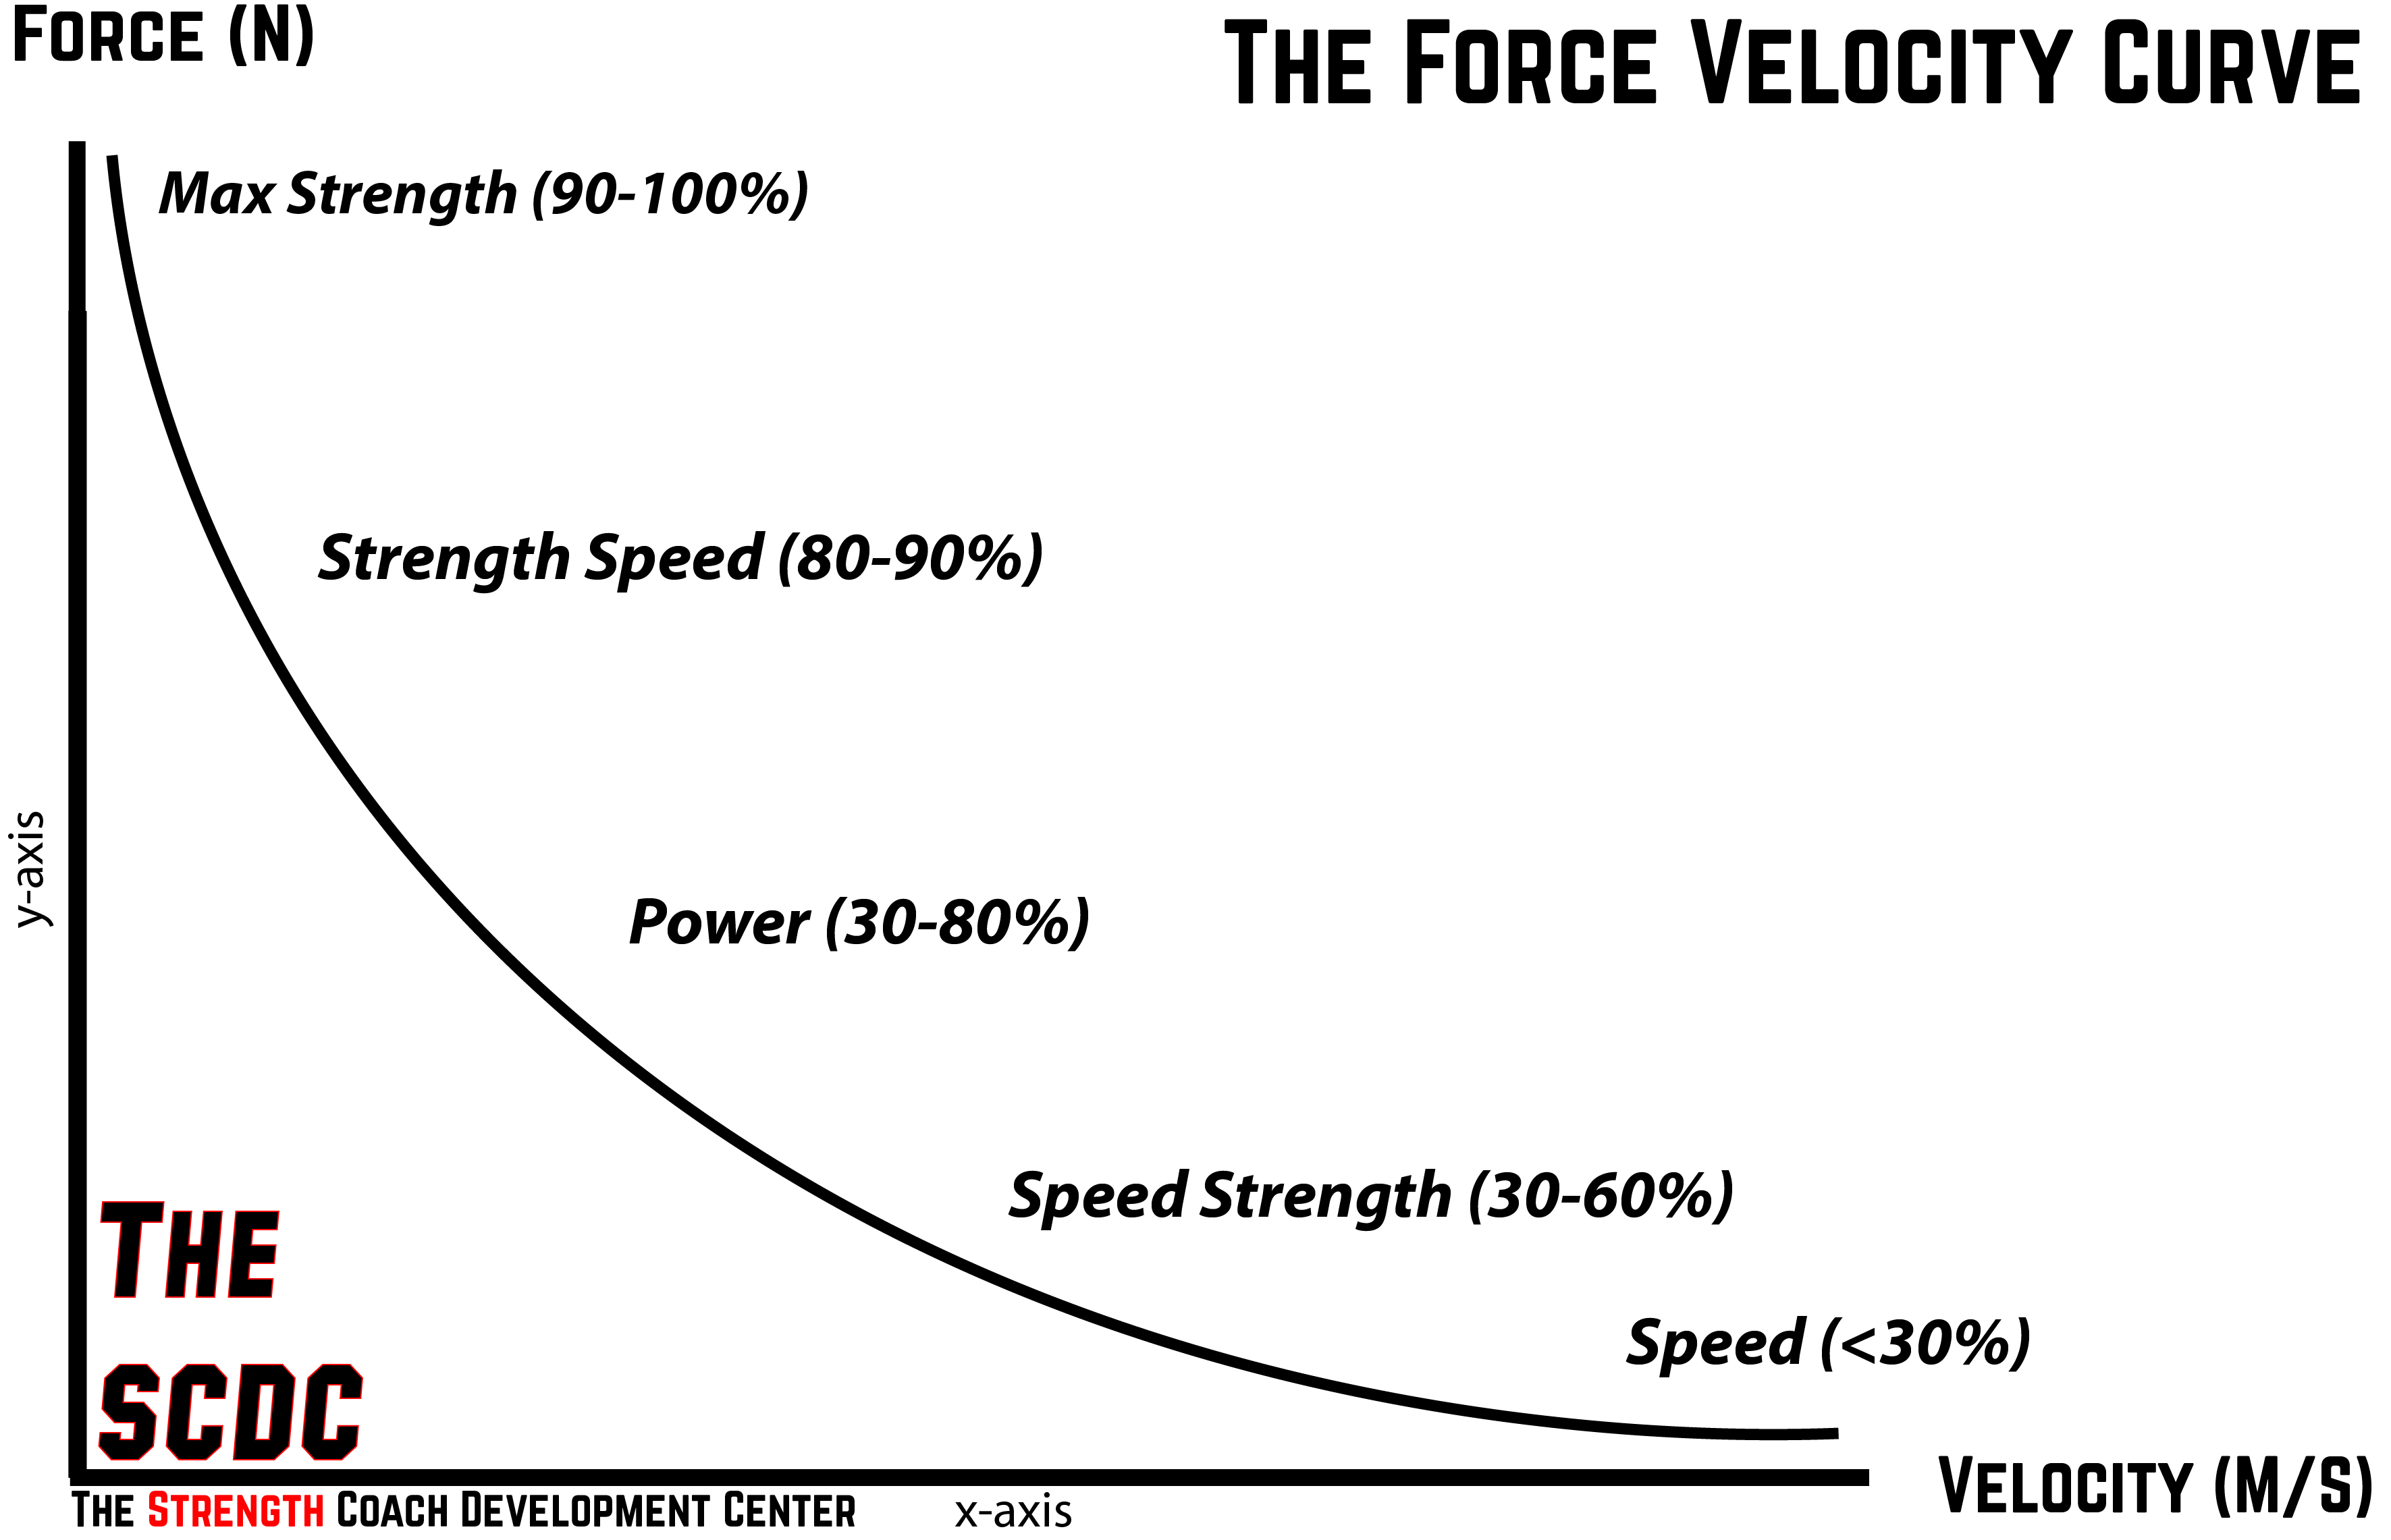
Let’s get scientific today at UF. We can discuss the force-velocity curve all day long and debate the minor details involved in lifting, and I’d love it. Yet, today I would like to give you a quick overview on the force-velocity curve and why it is important to you.


The Coach's Guide to Programming and Periodization: Surfing The Force-Velocity  Curve and Changing Seasons / Elite FTS


This image came from elitefts.com, if you are not aware of elitefts I would recommend checking them out. I have been fortunate enough to be involved with them for over a decade.


Notice on this curve that the top left is maximal strength. This is training when the bar is under .3 meters per second squared. For our purposes the speed at the bottom right of this graph end is at around 2.0 meters per second squared. The reason I said for our purposes is that we are looking at this graph always under load, notice the percents on this chart. What this means in practical terms is that I am not considering high level plyometrics or sprints. These do have their place yet I just want you to begin considering how this matters when dealing with weights.


Why is this important to you?


If your goal is to get stronger the single most effective thing you can do is train heavy and hard. Remember Specific Adaptation to Imposed Demands (SAID principle). If you want to move more weight you must train under heavy load. Yet as you can see this curve has a lot of space under it, and we must move the entire curve up and to the right if we wish to perform our best.


If you have never considered what I am writing about I would recommend that you begin performing some low levels strength explosive movements. You do not need to change your overall programming in order to do this. Just add this into your warm up. Here are some examples of things you could do.


  1. Med Ball Chest Pass 3×10 prior or benching.
  2. Box Jumps 3×5 prior to squat or deadlift.
  3. Med Ball Scoop Throws 3×5-10 prior to squat or deadlift.
  4. Broad Jumps 3×3 prior to squat or deadlift.
  5. KB work, swings push presses, or snatches. I’d do these any day.
  6. Explosive push ups 3×5-10 prior to benching.
  7. Weighted Jumps 3×3 prior to squat or deadlift.
  8. McGill Pull Ups prior to any lift.


These are just a few examples,  yet there are many ways to sneak in this extra work without hurting your main lifts (and hopefully helping the main lift). As with any new idea implement this in for a few cycles, test it and see what your results are. Don’t ignore how this makes you feel as well. Maybe your numbers don’t go up but you feel better, there is something to be said for this as well.


Top Ten List: Dumb Things Lifters Do

For this Monday’s blog we are taking a humorous look at weird things we all do as lifters.


  1. Bug squasher squats. For the last few years I have noticed many lifters who unrack the bar and then do the bug squasher dance. Not sure when this began yet it makes zero sense and is funny to me (special shout out to Daniel McKim for the name).
  2. Slamming warm up sets. We all know that your 135 and 225 warm ups felt light. What we don’t need is a new divot in the deadlift platform because of your slam dunk warm up.
  3. While on deadlifts let’s talk about your set up. Barking at the bar while raising your arms to the heaven will not help you lift the weight. Settle down and lift the weight.
  4. Living on “pre-workout.” We all need a pick me up at times, yet if you cannot lift without one maybe you need more sleep, not more chemicals.
  5. Over-concerning yourself with records. We have all been to a holiday party (well before 2020) and heard, “my cousin’s friend is a world record holder.” Our “sport” has a record for everything so just get a PR and have fun.
  6. Making fun of CrossFit. Yes, it is an easy target yet if you can’t walk a flight of stairs maybe some CrossFit could help your GPP.
  7. Acting like bodybuilders are ego maniacs while we are humble. Sorry, reality check time. We all have egos and began lifting to feed that ego. It’s okay, and we can learn from those guys and gals in their string tank tops.
  8. RPE scales. Too often I see a video when the lifter says “RPE 8.5.” C’mon! First off, do we really need decimals? Secondly, when you miss your second rep the RPE is a 10. All joking aside with this one, be humble. It is fine to say that your set was really much harder than it should have been.
  9. Instafamous. Yes, we all know that you lifted today, and social media is a great way to learn from those around you. If you spend more time editing your videos than you did training then did you train?
  10. Missing life because of lifting. After these last 9 light-hearted comments this one is serious. Lifting is a lot of fun. Take it from a guy who has competed in more than 20 events. I have had some of the best lifers come up and offer to help me without me even asking. I have also seen people helping those who they are competing against. What I am begging of you is to live your life. See your family. If you miss a lift, it will be okay. If you have to shorten a lift to go see friends and family then do it. If 2020 taught us anything it is that none of us are islands. When I get my vaccine I will stop my lift early to buy any and all of you a coffee or beer.


Todd Hamer


KISS in the Age of HIT

KISS is it. No not the band. I know CeJ looks like he could be a member of the band circa 1977, yet let’s be honest here, they only have one good song. Now that I have alienated most of the Yinzers who love KISS, let’s talk about training. KISS is an acronym for Keep It Simple Stupid. This is one of the best things I did as a strength coach to improve my coaching and my athletes.


How many periodization models can you name? Conjugate, concurrent, western, tri-phasic, block or even 531. The confusion in training can be too much for many people. I know I often made this mistake. I was speaking to our own Cody Miller the other day about how often I have over-complicated my programming (for myself and my athletes). While I have never been a huge fan of HIT training as a year-round training style, I do believe we can learn a lot from these people. Look at Marty Gallagher, Dr. Ken Leistner, Mike Mentzer or even Arthur Jones.


HIT


For those of you unfamiliar with this style of training, it is simple, short, and hard. Even the great Dorian Yates used many of HIT’s methods to build his impressive physique. Dorian was known for having one of the best backs in the history of bodybuilding. Yet his secret to training was simplicity. HIT stands for High Intensity Training (in their case intensity is used as a mindset not % of 1 rep max). HIT training sessions are generally short with low total sets and most sets being taken to concentric failure or beyond. Training can be done as often as 5 times a week but generally, it is done 2-4 times per week.


I am not advocating to change your regimen to entirely HIT training, but I am claiming that too many overthink their training and do more thinking than working. I even look at Dr. Micheal Yessis’s 1×20 program as a continuation of HIT training. The difference is Yessis doesn’t train the athlete to fail. Yet it’s still one hard set of work and then moves on to the next exercise. This style of training does have its place in the gym and should not be ignored.


Moral of the story


When in doubt, train harder. Over my two decades in the iron game, I have seen too many people searching for the answer when the answer is more hard work. Build some sweat equity and push yourself to somewhere you have never been. I know I don’t have the answer yet I know hard work is never wrong.


– Todd Hamer

Time Your Rest for Greater Success

It’s no secret that all of us have the same general goal in mind each time we step foot into the gym, and that is to get better. Regardless of our specific goals, we all devote a great deal of hours each week over the course of years to better ourselves and to hopefully achieve the things that we set out to accomplish. One of the most overlooked and under rated aspects of training that can help us get there more quickly is how efficient our training sessions are. More importantly, how long we are taking to complete our workouts, and how much time we are taking in between sets and exercises. 


Now, I understand that for many of us, the gym is an outlet. A place where we can go to hang out with our friends, escape the stressors of daily life, and do something that we enjoy. This is absolutely a great thing in it’s own. Although if you have specific goals that you want to accomplish, you’re going to want to step it up a notch and stay focused during the entirety of your training session. 


There have been thousands of studies done over the years regarding the best training rest periods depending on what aspect you’re focusing on. Although many of them may have different findings, the consensus is still mostly the same.


Strength & Power training (1-6 reps) = 3-5 minutes of rest.


Hypertrophy & muscle building (6-12 reps) = 1-2 minutes of rest.


Endurance & Conditioning (12+ reps) = 45 seconds-2 minutes of rest.


Now that we understand this, we can better prioritize our rest periods to suit our goals. Although this is a very small aspect of our programming routine, it has the ability to play a huge role in the outcome of our success. If you are training solo, then grab a stop watch and see the results for yourself. If you are fortunate enough to have one or more training partners, then the best stopwatch is the pace that each of you set and your drive to keep up with each other. Remember, the main purpose behind training (either by yourself or with someone else) is to challenge and push yourself. If you are sitting around in between sets wasting time, you are doing the exact opposite. So, close your Instagram and Facebook accounts, leave your phones in the car, grab a watch, and time those rest periods. You will be surprised at how much progress you can make once you decide to push yourself a little harder.


Stay strong, friends!

Control Your Deadlifts for Better Progress.

Out of all of the major compound lifts, the deadlift is the only one that does not require an eccentric (lowering) phase to initiate the movement. Because of this, the concentric (lifting) portion is hands down the most important aspect to be trained. But, what if I told you that focusing on how you return the bar to the floor could greatly help you increase the quality and strength of your pull?


We’ve all seen it, someone sets up for a set of deadlifts, lifts it with great form and control, only to be followed by an uncontrolled limp-body descent. If you watch closely, there’s a good chance that you’ll notice each of the following reps become less sound and less technical than the one before. Whether you’re a powerlifter training for a competition, or someone simply looking to improve strength, the goal should always be to make every repetition an exact representation of the one before.


Now, I completely understand that holding a bar in your hands loaded with heavy weight for any period of time can be uncomfortable. The last thing that anyone wants is to feel the knurling of a bar trying to pull the skin off of their hands. But if you’re going to take the time to perform a lift every single week for months and years on end, why not take the time to get the most out of it possible, right?


So, if the deadlift is a concentric only lift, then what’s the point of worrying about how we lower it? Well, let’s look at the squat and the bench press. As you lower the bar, you’re gaining feedback from your body on what muscles are firing and how to keep them tense and engaged. This then allows you to be in a stronger position for the concentric portion. So even if the squat and bench press started from the bottom up, by practicing this technique we would sill get stronger. The more practice we have doing this and the better that we get, the more efficient we can be. Over time, this adds up into many technically sound lifts, which allows us to also get stronger.


So how do we apply this to the deadlift? The easiest way is to try to make your pull and your return look like a mirror image. If you were to watch the entire lift on film, it should look the exact same when played forward or backwards. While you’re doing this, be sure to start light and take your time. Understand that at first this may affect how much you can lift overall, but it will drastically improve your strength over time. Start with around 60-70% of your max and try to take around 3 seconds to return the bar to the floor. During that time, focus on recognizing which muscles are working, and what needs to be done in order to keep them engaged. Do not lose that tension once the bar returns to the floor. Even in between reps, keep tension, stay engaged, and in the exact position that you want to perform the next rep. This will then help you know exactly what to do when you begin your first pull, even without being able to perform the eccentric phase. Over time, as you learn how to build and keep tension throughout your body, you can start applying this to heavier weights, and you will begin to see your strength and technique improve tremendously.


If you see me in the gym, don’t hesitate to grab me and ask for help. If you follow me on Instagram, don’t hesitate to send me your videos. I’m glad to help any way I can. Stay strong, my friends!


Curtis

Review of Muscular Tension

One of the best books one can read to understand training (IMO) is  “Science and Practice of Strength Training,” by Vladimir Zatriorksy. Dr. Zatriorsky was a professor at Penn State for years and I was lucky enough to meet him and spend time trying to understand what he was saying (he is really smart).


In the book he discusses the three methods to increase muscular tension. This is important to understand if you want to increase your strength levels. I have listed the three methods to increase muscular tension, I also added in descriptions and examples of each.


  1. Dynamic Effort Method- This is moving a light weight as fast as possible. This could be doing anything from jumping to throwing or doing any explosive lift. Louie Simmons made this popular with speed bench and speed squats. Dr. Fred Hatfield also helped grow this method in his book “Bodybuilding, A Scientific Approach.” He used the term Compensatory Acceleration Training (CAT). While I do not think these are 100% interchangeable I do believe they are similar enough that you can replace one with the other. Either way keep your reps between 3-6 and move something explosively.
  2. Maximal Effort Method- This is the exact opposite of Dynamic Effort. Now the intent is to move a heavy load. Velocity can, and often will, drop below .2 m/s. In lifter terms this is learning how to strain against a heavy weight. This is a very effective way to increase strength yet we must be cautious as technique will often break down and the opportunity for overtraining exists here.
  3. Repetition Effort Method- This is the method everyone knows. The goal here is to train a muscle until it fatigues. This could be done with 3×10 or for timed sets 3×45 seconds. One variation I believe we should highlight here is escalating density training. This is done by doing lower reps with very short rest periods. One could do pull ups for 20 sets of 3 with 10 seconds rest. This is a way to achieve huge volume and a ton of reps without letting technique break down.


This is just a short overview of these methods and entire college course could be taught on this yet I want all of you to have the basic understanding of what is going on. If you ever want to talk any further on this topic please stop me as I could go on for days. So maybe ask someone else as I wouldn’t want to bore you.


Hamer